Contact
Home |240Z Mechanics| |Patents| |Art| |Recipes|
BioPatent Communications Contact Me for Discussions About Arts, Technology, and Culture (Blog Me/Pod Me).
| Changing
a Transmission
|
ContactHome |240Z Mechanics| |Patents| |Art| |Recipes| |
BioPatent Communications Contact Me for Discussions About Arts, Technology, and Culture (Blog Me/Pod Me). |
I. Removing the Transmission
II. - Go To Changing Clutch; III. - Go To Changing U-Joint; IV. - Go To Replacing Transmission
If you have a transmission problem, you can save a lot on the repair cost if you agree to remove the transmission yourself and deliver it to the transmission shop. Once you have the transmission out, it is fairly easy to rebuild the clutch.
Another reason to pull the transmission in a 240Z is to replace the stock 4-speed or manual transmission with a 5-speed transmission from a 280Z. The overdrive is great on the highway and improves gas mileage.
1. Go to Shifter 2. Go to Drive Shaft 3. Go to Remove Transmission
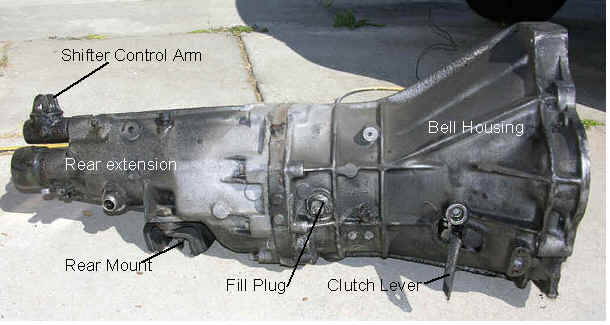 Pulling
a rear drive transmission does not take any special tools or skills. The steps
require only basic removal on bolts and removal of parts (of course, reassembly
can be another story). For starters, remove the shifter from inside the passenger
compartment. Remove the drive shaft ("propeller shaft" in the shop manual)
from the differential and slip it out back from the transmission. Remove the starter
motor, which is bolted to the transmission bell housing. Remove the large bolts that
hold the transmission to the engine block, and the small bolts that hold the dust shield
in the bottom front of the transmission. Remove the two bolts that hold the clutch
slave cylinder onto the bell housing. Twist the speedometer cable from its mount at
the transmission rear extension housing. Disconnect the reverse light wires. Remove the
cross member that supports the transmission at the rear extension. Pull the
transmission back and drop it out of the transmission tunnel.
Pulling
a rear drive transmission does not take any special tools or skills. The steps
require only basic removal on bolts and removal of parts (of course, reassembly
can be another story). For starters, remove the shifter from inside the passenger
compartment. Remove the drive shaft ("propeller shaft" in the shop manual)
from the differential and slip it out back from the transmission. Remove the starter
motor, which is bolted to the transmission bell housing. Remove the large bolts that
hold the transmission to the engine block, and the small bolts that hold the dust shield
in the bottom front of the transmission. Remove the two bolts that hold the clutch
slave cylinder onto the bell housing. Twist the speedometer cable from its mount at
the transmission rear extension housing. Disconnect the reverse light wires. Remove the
cross member that supports the transmission at the rear extension. Pull the
transmission back and drop it out of the transmission tunnel.
While I am disassembling, I have sandwich bags and twist ties available. All the parts associated with each task are kept together so they don't get mixed up with nuts and bolts from other disassembly steps. I use twist ties to hold some parts together, like nuts and washers that go with particular wire connectors, or bolts that mount certain parts. Some bolts I just thread back in their hole for storage after removing their part.
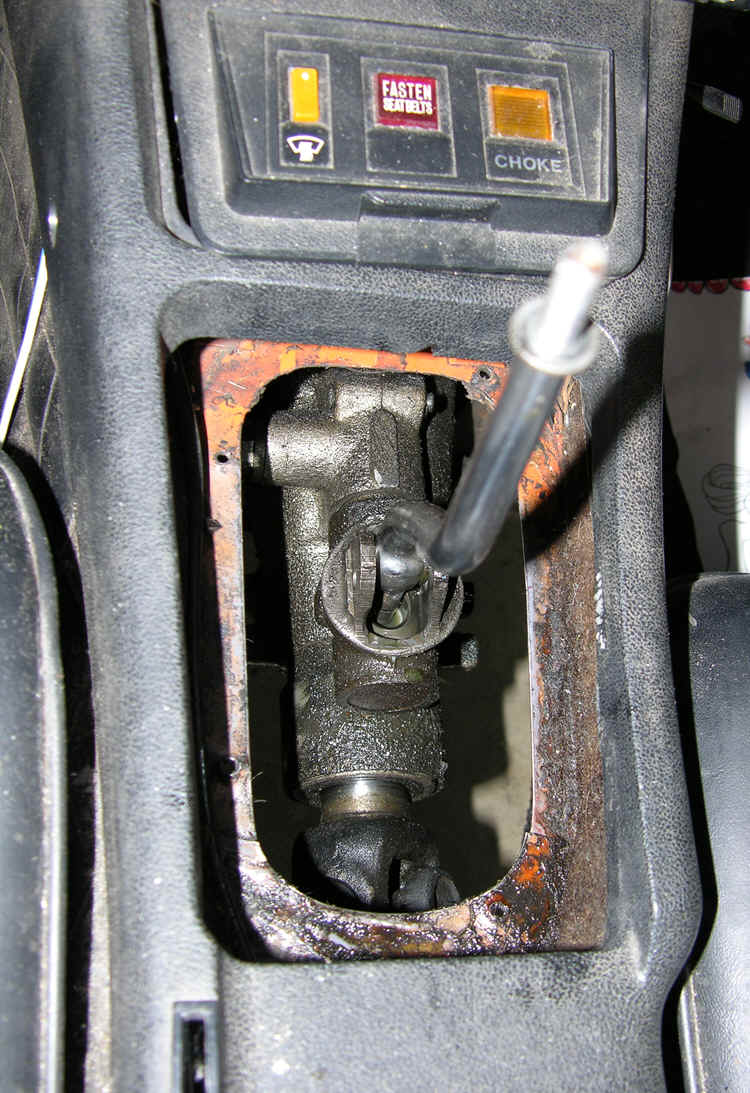 Shifter. Removing
the shifter is fairly easy. Unscrew the shifter grip handle and remove it from the
shifter lever. Unscrew all the mounting screws from the plastic center
console. With these screws out, you can lift the console up to more easily remove
and reinstall the parts associated with the shifter. Remove the clips holding the
leather outer boot. Remove the screws and flange the hold the rubber inner boot.
Pull the small rubber boot off of the shifter control arm. A C-clip
holds the pivot pin on which the shifter pivots. I have a little hook tool I use to
pull off the C-clip (alternately, there are other fairly cheap C-clip removing
tools, or you can push it off with a screw driver or ice pick). The C-clip is spring
loaded and will go flying, never to be found, if you are not careful. With the
C-clip removed, you can push the pivot pin out and withdraw the shifter lever from the
shifter control arm.
Shifter. Removing
the shifter is fairly easy. Unscrew the shifter grip handle and remove it from the
shifter lever. Unscrew all the mounting screws from the plastic center
console. With these screws out, you can lift the console up to more easily remove
and reinstall the parts associated with the shifter. Remove the clips holding the
leather outer boot. Remove the screws and flange the hold the rubber inner boot.
Pull the small rubber boot off of the shifter control arm. A C-clip
holds the pivot pin on which the shifter pivots. I have a little hook tool I use to
pull off the C-clip (alternately, there are other fairly cheap C-clip removing
tools, or you can push it off with a screw driver or ice pick). The C-clip is spring
loaded and will go flying, never to be found, if you are not careful. With the
C-clip removed, you can push the pivot pin out and withdraw the shifter lever from the
shifter control arm.
There are removable plastic bushings that the pivot pin was mounted in. Inexpensive plastic or brass replacement bushings are available. You will be happily surprised how precise and tight the shifter can be when worn bushings are replaced with new ones.
Disconnect battery terminal and remove the starter motor. Remember where all the wires go on the starter or take a digital photo. Turn out the large mounting bolts, one of which is the main battery ground for the engine and starter circuit. Shift the starter out forward and drop it down past the frame rails.
Safely raise the vehicle. Transmission removal and installation are easier if you can get the vehicle up pretty high, e.g., so there is enough room manhandle the transmission and to get it out from under the car. They always say, "put the car up on jack stands!" I always do more than that, especially for this job, where you find yourself under the car wrestling with parts and pulling hard on wrenches. I put the car up high on jack stands, leave the floor jack in place, and leave blocks of wood under the wheels. Redundant safety.
There is an oil seal at the back of the transmission that is fully open once the drive shaft is pulled out. If you do not drain the transmission oil now, by removing the drain plug, there will be quite a mess flow of tranny oil when you remove the drive shaft and when the tranny tilts back as you are pulling it out.
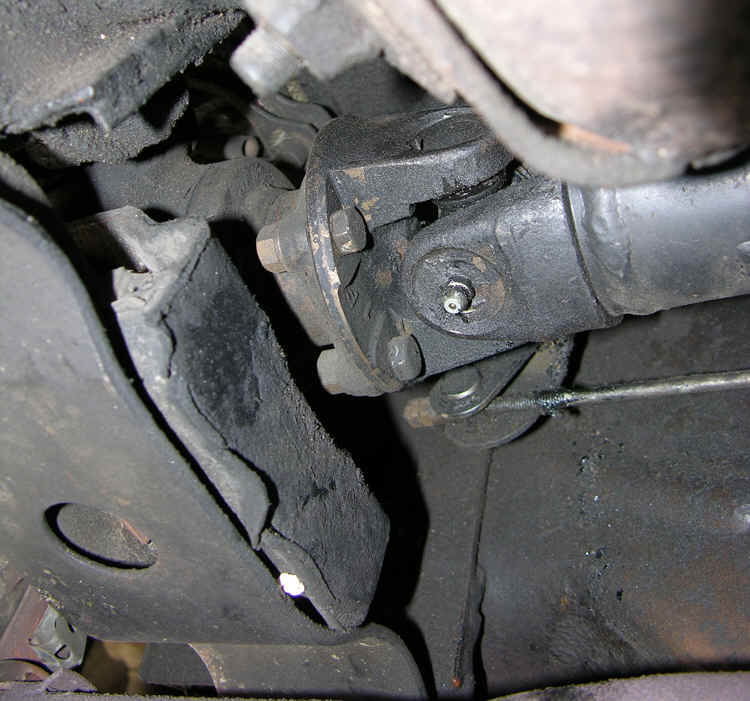 Pulling the Drive Shaft. Where the drive shaft attaches to the
differential, hold the back of an accessible nut with a box-end wrench while loosening associated bolt
in fromt with an open-end wrench to remove the first bolt. With the
transmission in neutral and the emergency brake off, raise the rear of the car
so that one of the rear wheels can be turned. Turn the wheel so that another nut
and bolt will rotate into the position that gives the best access for the two
wrenches required to remove the bolt. Pull the emergency brake so the parts can't turn while you loosen the second bolt. Repeat
the process until all four bolts that attach the drive shaft to the differential are
removed. The drive shaft can now drop from the differential and slide out from the
rear seal of the transmission. Be prepared to catch transmission oil that may drip
from the rear end of the transmission.
Pulling the Drive Shaft. Where the drive shaft attaches to the
differential, hold the back of an accessible nut with a box-end wrench while loosening associated bolt
in fromt with an open-end wrench to remove the first bolt. With the
transmission in neutral and the emergency brake off, raise the rear of the car
so that one of the rear wheels can be turned. Turn the wheel so that another nut
and bolt will rotate into the position that gives the best access for the two
wrenches required to remove the bolt. Pull the emergency brake so the parts can't turn while you loosen the second bolt. Repeat
the process until all four bolts that attach the drive shaft to the differential are
removed. The drive shaft can now drop from the differential and slide out from the
rear seal of the transmission. Be prepared to catch transmission oil that may drip
from the rear end of the transmission.
Remove the two bolts that hold the clutch slave cylinder onto the bell housing. Twist off the speedometer cable mount to release it from the rear extension housing. Disconnect the wires associated with the reverse back up light. Depending on your exhaust system, you may have to remove or loosen the exhaust pipe in order to get the bell housing out of the transmission tunnel.
Removing the Transmission. Remove the starter motor wires and the bolts that hold it onto the bell
housing. Remove the large bolts around the bell housing that hold the transmission
to the engine block, and the small bolts that hold the dust shield in the bottom front of
the transmission. The bolts holding the bell housing on to the engine block are of
various lengths so it is a good idea to number them in some way to help get them back in
the right place on reassembly. The upper bolts can be reached with box end wrenches
from the engine compartment.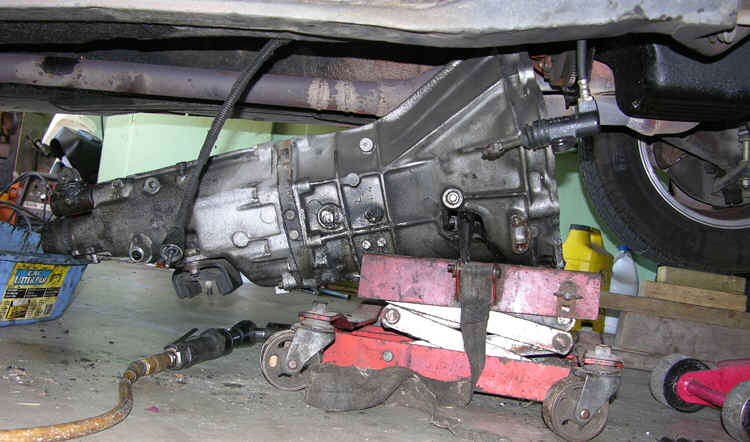
Support the rear of the engine at the drain pan with a jack under a block of wood. Support the transmission with a transmission jack or blocks (the first few times I did this job without a transmission jack, but you have to be strong to reinstall it without one). Turn out the nut in the center of the cross member mount at the rear extension of the transmission. Remove the two large bolts on the ends of the cross member so the cross member can fallout of the way. Now, nothing is supporting the transmission but the main transmission shaft where it is inserted through the clutch disk and into the engine crank shaft. The engine and transmission are only held in place by the two side engine mounts.
Slide the whole transmission back a few inches until the main transmission shaft is released from the clutch. Lower the transmission out from the transmission tunnel to the floor and slide it out from under the car.
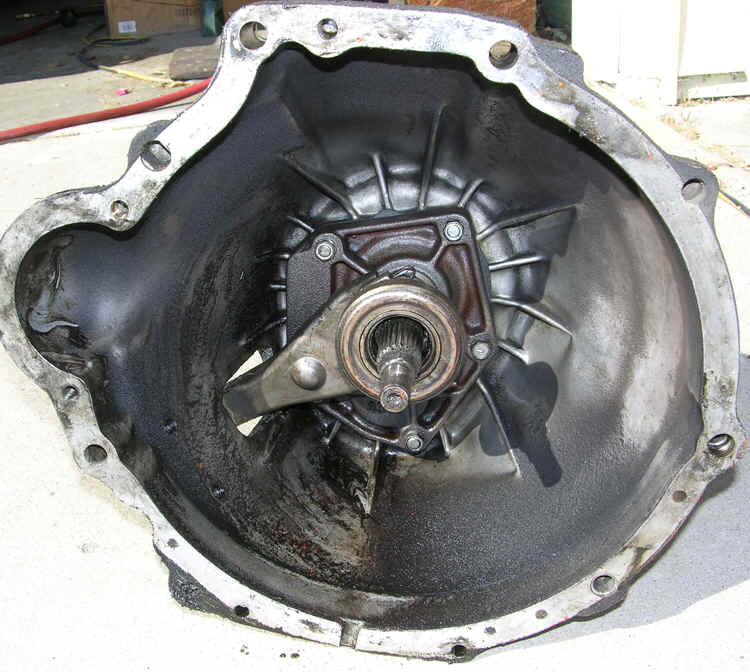
If you take your transmission to a transmission shop, strip everything of importance off it first. For example remove the clutch fork, throwout bearing, rubber boot from the bell housing side wall, maybe even the plastic gear where the speedometer cable goes into the rear extension of the transmission. These tranny repair guys strip down the transmission and have repeatedly failed to return more than the basic transmission unit when they are done. So, you have to put all the little do-dads back on before you install the transmission. If you have any doubts about the rear transmission seal, now is a good time to replace it.
The job is similar with an automatic transmission, but there are a transmission oil cooler lines, a vacuum line, and such, that have to be dealt with (but, no slave cylinder).
II. -
Go To Changing
Clutch
III. - Go To Changing U-Joint
IV. - Go To Replacing Transmission
BioPatent Communications Contact Me for Discussions About Arts, Technology, and Culture (Blog Me/Pod Me).
Return to BioPatent Home: Return
|240Z Renewal Page| |Air-conditioning Repair|
|Performance 240Z| |Lost Wax Casting Page| |240Z Engine Rebuild| |Trademarks|