body { min-height: 100vh; max-width: 960px; background-color: papayawhip; margin:
auto; }
BioPatent Communications
II. Changing the Clutch
I. -
Go To Removing the Transmission
III. - Go To Changing
U-Joint IV. -
Go To Replacing Transmission
Gary L. Baker, Esq. Patent Attorney
You may want to change the clutch because you had to remove the transmission
for other reasons and it is best to keep it fresh, because the old clutch was worn
out, and/or because you wanted to upgrade to a clutch that can handle more power.
In any case, once the transmission is removed, it is no big deal to install a new
clutch.
1.
Go to Fly Wheel
2. .
Go to Throwout Bearing
3.
Go to Installing the New Clutch
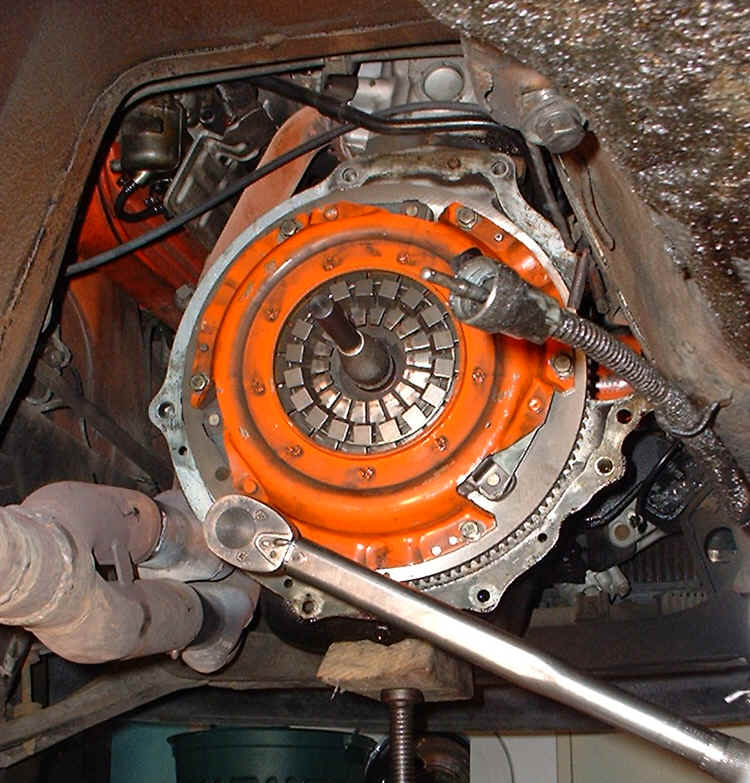 Use a clutch plate centering tool to hold the clutch plate in place
while you remove the clutch pressure plate (orange, left). Turn out the six
bolts that hold the pressure plate on to the fly wheel. With the bolts removed,
the pressure plate and clutch disk can be easily pulled from the face of the fly
wheel.
Use a clutch plate centering tool to hold the clutch plate in place
while you remove the clutch pressure plate (orange, left). Turn out the six
bolts that hold the pressure plate on to the fly wheel. With the bolts removed,
the pressure plate and clutch disk can be easily pulled from the face of the fly
wheel.
I always replace the pressure plate and clutch disk
every time I have a transmission off. But, in this case, I was shocked to
see the parts were barely worn after 30,000 miles of hard use. The pressure
plate and disk were heavy duty units from Centerforce®. A 240Z only weighs
about 2200 pounds, so even with my upgraded engine, the clutch apparently does not
work hard launching me here and there. I am saving the used clutch plate and
disk to install some other day in some other Z.
Notice the Centerforce pressure plate has weights
(squares around the edge of the inner circle in the figure) that are connected to
lever fingers of the clutch diaphragm spring. The diaphragm spring provides
the pressure that squeezes the clutch disk between the pressure plate and fly wheel
to start the car moving when you let out the clutch. When the engine is spinning
at high rpms, the centripetal force on the weights pushes the finger levers out,
increasing the squeezing pressure on the clutch disk. With the old stock clutch,
the torque of my modified engine would often cause the clutch to slip and spin wildly
when I punched it off the line. That is, the clutch would slip and spin instead
of my tires spinning (embarrassing). I have never had this problem since I
installed the Centerforce clutch. The added benefit is that, in my small 240Z,
this performance part will apparently last a lifetime.
 Fly Wheel.
With the clutch disk removed, you can inspect the fly wheel (shiny
disk, in the figure to the right, at the end of the engine block). The fly
wheel is the disk attached to the back of the engine crank shaft in frictional contact
with the clutch disk to start a car moving. The fly wheel is heavy and can
store kinetic energy for smoother engine rotation and faster starts when the clutch
is released. So ... the fly wheel is exposed to a lot of heat and abrasion
in use. Inspect the fly wheel for cracks or warpage caused by heat stress.
Look for deep grooves caused by the clutch disk rubbing during starts. Check
to see that all the teeth are still present around the perimeter of the fly wheel.
These teeth engage the starter motor pinion gear to turn over the engine when starting
the car. If the fly wheel needs repair or placement, it is not too difficult
to take out by removing the six bolts shown in the photo at right. Typically,
people will have the fly wheel "turned" (milled or resurfaced on a lathe) to provide
a smooth new surface. Some people replace the fly wheel with a lighter fly
wheel so the engine "spins up" faster, for some types of road racing. I like
my heavy stock fly wheel, which releases more kinetic energy when I release the
clutch.
Fly Wheel.
With the clutch disk removed, you can inspect the fly wheel (shiny
disk, in the figure to the right, at the end of the engine block). The fly
wheel is the disk attached to the back of the engine crank shaft in frictional contact
with the clutch disk to start a car moving. The fly wheel is heavy and can
store kinetic energy for smoother engine rotation and faster starts when the clutch
is released. So ... the fly wheel is exposed to a lot of heat and abrasion
in use. Inspect the fly wheel for cracks or warpage caused by heat stress.
Look for deep grooves caused by the clutch disk rubbing during starts. Check
to see that all the teeth are still present around the perimeter of the fly wheel.
These teeth engage the starter motor pinion gear to turn over the engine when starting
the car. If the fly wheel needs repair or placement, it is not too difficult
to take out by removing the six bolts shown in the photo at right. Typically,
people will have the fly wheel "turned" (milled or resurfaced on a lathe) to provide
a smooth new surface. Some people replace the fly wheel with a lighter fly
wheel so the engine "spins up" faster, for some types of road racing. I like
my heavy stock fly wheel, which releases more kinetic energy when I release the
clutch.
|
|
|

BioPatent
Communications
Contact Me for Discussions About
Arts, Technology, and Culture (Blog Me/Pod Me).
|
 Throwout Bearing.
Stepping on the clutch ultimately causes the throwout bearing
to push the diaphragm spring finger levers to release the clutch disk, thus disengaging
the engine from the transmission. That is, when you step on the clutch, hydraulic
fluid (brake fluid) from the master cylinder pushes the slave cylinder, which in
turn pivots the clutch fork lever, which pushes the throwout bearing into the finger
levers of the diaphragm spring to release squeezing pressure on the clutch disk.
The throwout bearing rotates freely against the diaphragm spring levers, allowing
the clutch fork to push the spinning diaphragm spring without grinding the parts
together.
Throwout Bearing.
Stepping on the clutch ultimately causes the throwout bearing
to push the diaphragm spring finger levers to release the clutch disk, thus disengaging
the engine from the transmission. That is, when you step on the clutch, hydraulic
fluid (brake fluid) from the master cylinder pushes the slave cylinder, which in
turn pivots the clutch fork lever, which pushes the throwout bearing into the finger
levers of the diaphragm spring to release squeezing pressure on the clutch disk.
The throwout bearing rotates freely against the diaphragm spring levers, allowing
the clutch fork to push the spinning diaphragm spring without grinding the parts
together.
Throwout bearings are sealed bearings, now days,
and rarely ever go bad. However they are inexpensive and should always be
changed as part of a clutch job.
The throwout bearing is pressed into a bearing sleeve
that attaches the bearing to the clutch fork. Professional shops typically
use an arbor press to press the old throwout bearing out of the sleeve. However,
the photograph at left shows another way to remove the old throwout bearing from
the sleeve. Find a socket that just fits inside the internal diameter of the
throwout bearing, but rests on the part of the sleeve inside the bearing.
Set the old bearing between two blocks of wood, as shown in the photo, while the
sleeve hangs between the blocks without contact. Strike the socket with
a mallet to push the sleeve out of the old bearing. A new throwout bearing
can be installed by hammering it onto the sleeve carefully with the mallet.
Of course, do not strike the parts with a metal hammer or do anything that would
damage the parts.
The throwout bearing sleeve should be cleaned then
the internal recess filled with grease so it can slide smoothly between engaging
and disengaging positions.
Note that if you are replacing a stock 240Z 4-speed
with a 280Z 5-speed, you must use the throwout bearing sleeve from the 5-speed,
or you will not be able to adjust the clutch after everything is back together.
 Installing the New Clutch.
Apply some grease to the pilot bushing in the center
of the fly wheel (not too much or the main transmission shaft might not be able
to fit into the pilot bushing when the transmission is installed). Center
the new clutch disk on the fly wheel and hold it centered with a centering tool
. I use the generic centering tool shown in the figures. Cheap plastic
centering tools can be purchased which specifically fit the 240Z pilot bushing and
clutch disk center spline hole. Years ago, I used to use a piece of broom
handle. The clutch manufacturers always warn you to put the clutch disk on
with the springs facing out (as shown, right), and not facing the fly wheel.
Installing the New Clutch.
Apply some grease to the pilot bushing in the center
of the fly wheel (not too much or the main transmission shaft might not be able
to fit into the pilot bushing when the transmission is installed). Center
the new clutch disk on the fly wheel and hold it centered with a centering tool
. I use the generic centering tool shown in the figures. Cheap plastic
centering tools can be purchased which specifically fit the 240Z pilot bushing and
clutch disk center spline hole. Years ago, I used to use a piece of broom
handle. The clutch manufacturers always warn you to put the clutch disk on
with the springs facing out (as shown, right), and not facing the fly wheel.
 Place the new pressure plate over the clutch disk on the fly wheel.
There are alignment posts in the fly wheel that fit in corresponding alignment holes
in the pressure plate, to center it perfectly. Turn in the six pressure plate
bolts loosely until the pressure plate is positioned properly in contact with the
fly wheel. Using a torque wrench, tighten each bolt to from 11 to 16 foot
pounds. Tighten in a star pattern alternating from one bolt to the next across
the pressure plate.
Place the new pressure plate over the clutch disk on the fly wheel.
There are alignment posts in the fly wheel that fit in corresponding alignment holes
in the pressure plate, to center it perfectly. Turn in the six pressure plate
bolts loosely until the pressure plate is positioned properly in contact with the
fly wheel. Using a torque wrench, tighten each bolt to from 11 to 16 foot
pounds. Tighten in a star pattern alternating from one bolt to the next across
the pressure plate.
Remove the centering tool from the clutch disk, which
is now held in place squeezed between the fly wheel and the pressure plate.
Add a tiny bit of grease to the splines in the center hole of the clutch disk, but
not enough to possibly ever drip out to the clutch disk surface.
The new clutch is now in place on the fly wheel.
I. - Go Back To Pulling
the Transmission
III. -
Go To Changing U-Joint
IV. -
Go To Replacing the Transmission
Contact Gary Baker
Return to BioPatent Home Page:
Return to Home
BioPatent
Communications
Contact Me for Discussions About Arts, Technology,
and Culture (Blog Me/Pod Me).
BioPatent
Home Page