| |
Click to see:
Performance 240Z
240Z Engine Rebuild
240Z Struts Replacement
Air Conditioning Repair
|
BioPatent
Communications
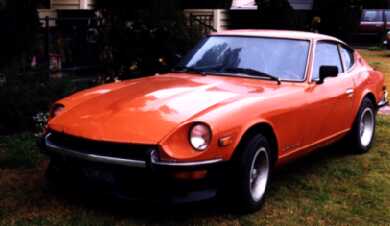
Datsun 240Z
Front
Brake Upgrade
(Replacing Calipers and Rotors)
Gary L. Baker, Esq. Patent Attorney
Although the front disk brakes of the early
240Zs was considered quite a sporty feature compared to the front drums
more common at the time, replacement with more modern calipers and rotors
can significantly improve braking in your 240Z.
I've had a variety of brake problems with my 50-year-old 240Z, such as a broken parking brake
cable (that can prevent self-adjustment of the rear drum brakes), bleeding
problems, and corroded caliper pistons. Over the years, I replaced
the cable, put in speed bleeders, rebuilt the calipers, and switched to
semi-metallic pads. Still, the first couple of stops in the morning
just kind of glided. Worse yet, sometimes in freeway panic stops
I pushed harder without feeling the expected additional stopping power.
Part of the problem was my glazed solid rotors and the stock 240Z 2-piston
calipers.
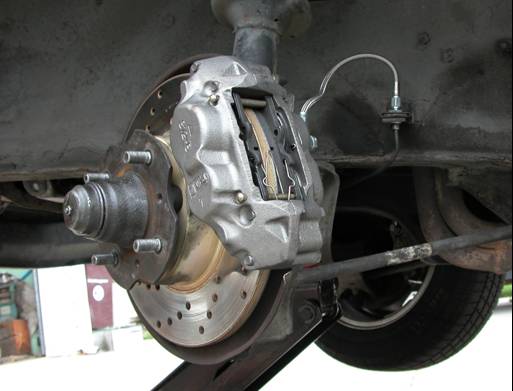
The stock 240Z
calipers use two hydraulic pistons to squeeze the rotor between a pair of
essentially square friction pads. The stock rotor is a solid unslotted
disk. This design can be improved with additional hydraulic
pistons pushing bigger pads onto a slotted rotor.
The 4-piston calipers from a1979-1984Toyota 4x4 happen to have mounting bolt holes arranged
to fit perfectly on the 240Z brake caliper mounting brackets. The
Toyota friction pads are curved rectangles that extend across the two pistons
on each side of the caliper to contact a much larger rotor surface.
The four hydraulic pistons provide a larger cross section for a greater
multiplication of brake pedal force. I purchased drilled and
slotted rotors from Motorsport Auto (1-800-633-6331) to further improve
the system (although the Toyota calipers will also fit the stock Datsun
rotors). The rotor drilling and slots are said to enhance cooling
of the rotor and increase friction by allowing gasses to escape the frictional
contact surface between the rotor and pads.
Removal of the stock
calipers and rotor: 1) jack up and redundantly support the Z; 2) remove
the front wheel; 3) disconnect the flexible brake line at the wheel well
mount and plug the line to prevent spillage of brake fluid; 4) remove the
caliper mounting bolts and lift off the caliper; 5) pull off the bearing
hub dust cap, remove the castle nut cotter pin and the castle nut; 6)
 pull
the hub assembly off the spindle; 7) turn out the 4 bolts that fix the hub
to the rotor (brace the hub with a large screw driver positioned between
the wheel studs); and, 8) separate the old rotor from the hub (I used a
blunt cold chisel with light taps at different positions between the hub
and rotor until they parted; it seems I could have alternatively placed
the rotor across a couple of wood blocks and knocked the hub out with a
mallet).
The only modification
required to install the Toyota calipers is to trim away small sections of
the baffle plate to allow clearance for the longer calipers. I used
a hand held angle grinder to remove about 1/2 inch of the baffle (you could
probably use a hack saw). As I ground, I kept checking the caliper
fit and removed the points of contact until the caliper could be installed
without interference. A lot of metal filings were produced - keep
your bearings out of the area and clean the spindle well before starting
reassembly.
Assembly, with the
new caliper and rotor is the opposite of removal steps. Before reassembly,
check the inner and outer bearings and races for scoring; check the rear
bearing seal for damage. Replace any damaged bearing parts.
Pack the bearings and hub with grease. Assembly: 1) pull the rotor
evenly on to the hub (left rotor on left hub, right rotor on right hub)
by progressively and alternately tightening the 4 bolts that fix the hub
to the rotor until the rotor is seated; 2) torque each of pull
the hub assembly off the spindle; 7) turn out the 4 bolts that fix the hub
to the rotor (brace the hub with a large screw driver positioned between
the wheel studs); and, 8) separate the old rotor from the hub (I used a
blunt cold chisel with light taps at different positions between the hub
and rotor until they parted; it seems I could have alternatively placed
the rotor across a couple of wood blocks and knocked the hub out with a
mallet).
The only modification
required to install the Toyota calipers is to trim away small sections of
the baffle plate to allow clearance for the longer calipers. I used
a hand held angle grinder to remove about 1/2 inch of the baffle (you could
probably use a hack saw). As I ground, I kept checking the caliper
fit and removed the points of contact until the caliper could be installed
without interference. A lot of metal filings were produced - keep
your bearings out of the area and clean the spindle well before starting
reassembly.
Assembly, with the
new caliper and rotor is the opposite of removal steps. Before reassembly,
check the inner and outer bearings and races for scoring; check the rear
bearing seal for damage. Replace any damaged bearing parts.
Pack the bearings and hub with grease. Assembly: 1) pull the rotor
evenly on to the hub (left rotor on left hub, right rotor on right hub)
by progressively and alternately tightening the 4 bolts that fix the hub
to the rotor until the rotor is seated; 2) torque each of
 the
bolts to 20 foot-pounds, then each to 35 foot pounds, while bracing the
assembly with a large screw driver (as shown in the photo above); 3) remount
the assembly on the spindle; 4) with the rear bearing well seated,
and the front bearing and bearing washer in place, turn the castle nut in
until hand tight; 5) spin the hub while you tighten the castle nut to 24
foot-pounds, then turn the castle nut back to the first available position
that allows the cotter pin to be reinserted; 6) replace the bearing hub
dust cap; 7) install the new caliper over the rotor (friction pads can be
in place at the time, or not; there are right and left calipers, so be sure
the larger piston and the bleeder valve are up) and turn the caliper
mounting bolts into their threads - torque to 75 foot-pounds; 8) connect
the Toyota flexible brake line at the wheel well brake line mount (be sure
the flexible brake line will not touch the wheel when turning a corner); 9) bleed
the brakes; 10) remount the wheel; and, 11) carefully test drive. the
bolts to 20 foot-pounds, then each to 35 foot pounds, while bracing the
assembly with a large screw driver (as shown in the photo above); 3) remount
the assembly on the spindle; 4) with the rear bearing well seated,
and the front bearing and bearing washer in place, turn the castle nut in
until hand tight; 5) spin the hub while you tighten the castle nut to 24
foot-pounds, then turn the castle nut back to the first available position
that allows the cotter pin to be reinserted; 6) replace the bearing hub
dust cap; 7) install the new caliper over the rotor (friction pads can be
in place at the time, or not; there are right and left calipers, so be sure
the larger piston and the bleeder valve are up) and turn the caliper
mounting bolts into their threads - torque to 75 foot-pounds; 8) connect
the Toyota flexible brake line at the wheel well brake line mount (be sure
the flexible brake line will not touch the wheel when turning a corner); 9) bleed
the brakes; 10) remount the wheel; and, 11) carefully test drive.
With the upgrade, pedal pressure
to stop was less. With hard stops, a little more pressure always gives
me more stopping power.
BioPatent
Communications
Contact Me for Discussions About Arts,
Technology, and Culture (Blog Me/Pod Me).
Return to BioPatent Home Page:
Return to
BP Home
Return to 240Z Home
Page:
Return to 240Z Home
Other BioPatent Pages:
|Protein Purification|
|Patent and Trade Secret Page|
|Lost
Wax Casting Page|
|Trademark Page|
|Patent Services Page|
BioPatent 240Z Rejuvenation Page Visited
 Times Times
|